penny pincher project {welcome mat diy}
i like to save a few bucks now and then, not according to my husband, but we aren't talking about him ;0)
i'm a penny pincher as it were. maybe not as much as my mom (she can make it scream!) but a thrifter by nature, yes.
i find it challenging to see what i can do with what i have or turn something someone else thinks is just a piece of nothing into something. i'm sure i've talked about this before, but i think it's partiallyto blame from my upbringing. we were taught to use what you have, make it work (yeah my mom was totally the first to use that-sorry tim gunn!), and see the beauty in whatever was around us. circumstances, beliefs or whatever the reason, that's the way it was.
to this day i have an affinity for older houses and their history and beauty, but that's another post entirely!
i love me some new things now and then, don't get me wrong, but i feel like we are such a "throw away" society. like everything is disposable and nothing really lasts. why is that? okay getting deep here. yet another post for another time! making a mental list. ok, re-focusing!
today i wanted to show you a quick and easy way for pinching those pennies! i'm hoping this is a new series...we'll see how we do ;0)

i like door mats. i feel like they say a little about you. i know it's JUST a door mat, and in the grand scheme of things not a big deal. but let's face it, we come in and out of our homes a lot and this is where we live and eat and sleep and have relationships. whoa deep! so i think doormats should be fun as well as utilitarian.
i recently noticed our welcome mat wasn't very welcoming and being a girl who can't leave well enough alone, i had to do something about it.
enter sample paint form Wal-Mart and Glidden. i love this stuff. it was about $2.50 i think for the sample bottle size. it comes in whatever color you want in satin paint. i also mixed in some varnish to protect the paint from the weather. you could use acrylic paint or spray paint as well.
all you need is
-a door mat (new or used, any type really)
-some paint (again any type you like)
-some letters to use as stencils. you could also use a shape or symbol. the possibilities are really endless.
-a paint brush and a roller brush
-a little patience and a few minutes
i stared with our used doormat from target? i've had for a year or so.

i started by shaking it out and then vacuuming it. i'm a little OCD sometimes so feel free to skip over the vacuum part if you like :)
i knew that i wanted the outside strip to be painted a bright mustard-y yellow color. we have this great little table and i wanted them to "go" together. it was also black and while i actually like brown and black together i didn't want them together on this project.
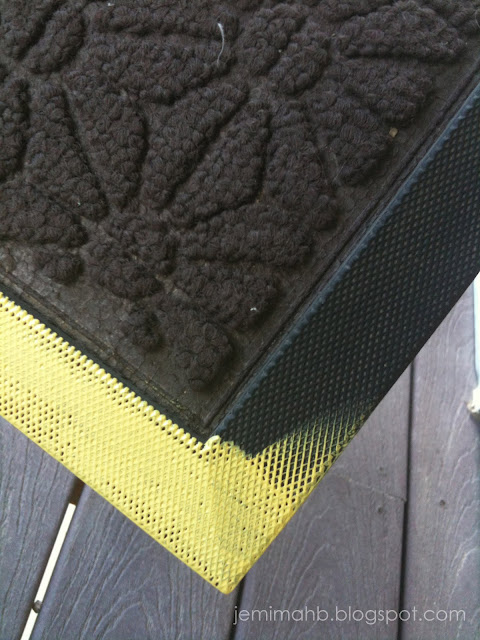 i took out my brush, put some paint on it and went to town. painting only the edge so i didn't get any paint on the "fabric" part on the inside.
 i also made sure to kind of wiggle the paint into the trim. it's made from this plastic that has tiny waffle like pattern all in it, so i wanted to make sure i tried to fill them for a more consistent look.
 i did one coat with acrylic alone as a base to help fill the trim, them went on to the Glidden paint for the actual color and look that i wanted.

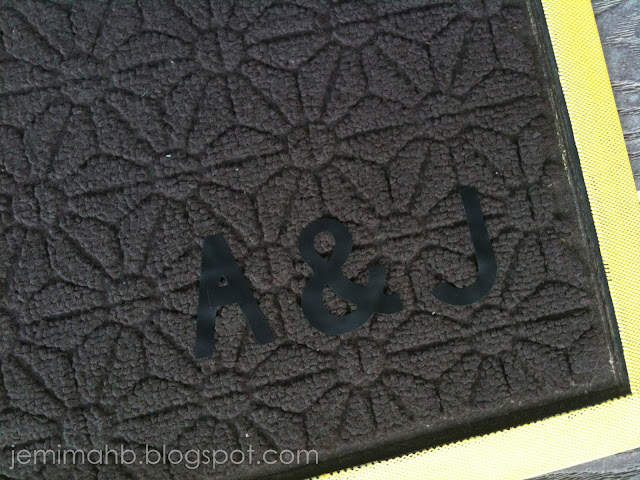
i knew i wanted to have the letters be the brown, so i used some sticky letters i had and placed them where i wanted.
 then i measured and framed out a block for the paint that was going to go around the letters. making a kind of relief look.
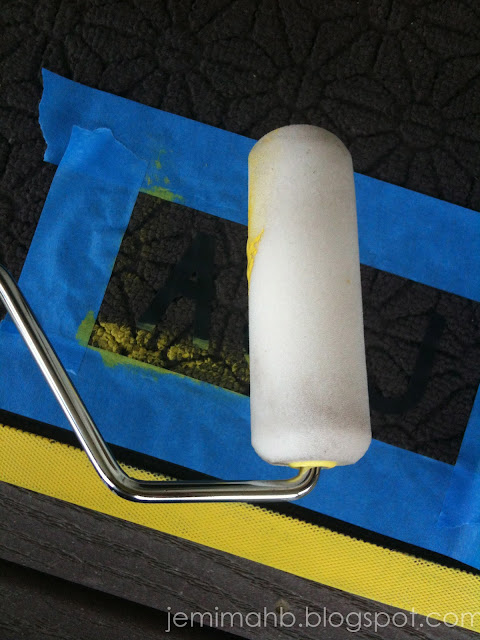 i painted over the letters using a rolling brush while being careful not to move the letters and accidentally paint underneath.
i removed the tape and sticky letters to reveal the brown letters on the mat.

one of the letters smudged a little but i don't mind. if i wanted i could go back in with brown paint and touch up but it's no biggy to me.

so there you go!
 super simple and easy to do. like i said i just used paint and a mat that i had around.
you could really make this your own and do whatever colors and type of mat you wanted.
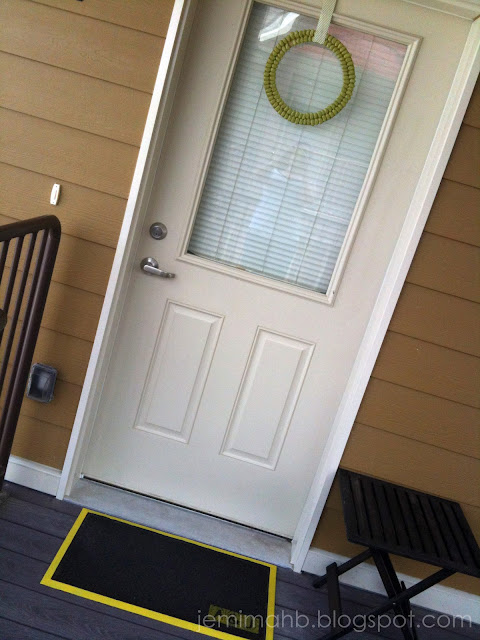
you could even get crazy and use a carpet remnant with a glued fabric boarder or even a metal mat spray painted a funky color with a huge symbol in the middle. go wild!
there you have it, penny pincher project: door mat

feel free to pin this project if you like. :)
what have you been painting lately? are you as serious about doormats as me? pinched any pennies lately?
happy welcoming and happy thursday!
~~~~~~~~~~~~~~~~~~~~~~~~~~~~~~~~~~~~~~~~~~~~~~~~~~~~~~~~~~~~~~~~~~~~~~~
have you entered this weeks giveaway yet? there's still time! click HERE to enter now!
~~~~~~~~~~~~~~~~~~~~~~~~~~~~~~~~~~~~~~~~~~~~~~~~~~~~~~~~~~~~~~~~~~~~~~~
i'm a penny pincher as it were. maybe not as much as my mom (she can make it scream!) but a thrifter by nature, yes.
i find it challenging to see what i can do with what i have or turn something someone else thinks is just a piece of nothing into something. i'm sure i've talked about this before, but i think it's partially
to this day i have an affinity for older houses and their history and beauty, but that's another post entirely!
i love me some new things now and then, don't get me wrong, but i feel like we are such a "throw away" society. like everything is disposable and nothing really lasts. why is that? okay getting deep here. yet another post for another time! making a mental list. ok, re-focusing!
today i wanted to show you a quick and easy way for pinching those pennies! i'm hoping this is a new series...we'll see how we do ;0)

i like door mats. i feel like they say a little about you. i know it's JUST a door mat, and in the grand scheme of things not a big deal. but let's face it, we come in and out of our homes a lot and this is where we live and eat and sleep and have relationships. whoa deep! so i think doormats should be fun as well as utilitarian.
i recently noticed our welcome mat wasn't very welcoming and being a girl who can't leave well enough alone, i had to do something about it.
enter sample paint form Wal-Mart and Glidden. i love this stuff. it was about $2.50 i think for the sample bottle size. it comes in whatever color you want in satin paint. i also mixed in some varnish to protect the paint from the weather. you could use acrylic paint or spray paint as well.
all you need is
-a door mat (new or used, any type really)
-some paint (again any type you like)
-some letters to use as stencils. you could also use a shape or symbol. the possibilities are really endless.
-a paint brush and a roller brush
-a little patience and a few minutes
i stared with our used doormat from target? i've had for a year or so.

i started by shaking it out and then vacuuming it. i'm a little OCD sometimes so feel free to skip over the vacuum part if you like :)
i knew that i wanted the outside strip to be painted a bright mustard-y yellow color. we have this great little table and i wanted them to "go" together. it was also black and while i actually like brown and black together i didn't want them together on this project.


here it is all trimmed out.
i then decided what i wanted on the inside. i chose a+j. awe!!!


i removed the tape and sticky letters to reveal the brown letters on the mat.


so there you go!

you could really make this your own and do whatever colors and type of mat you wanted.

you could even get crazy and use a carpet remnant with a glued fabric boarder or even a metal mat spray painted a funky color with a huge symbol in the middle. go wild!
there you have it, penny pincher project: door mat

{pin this photo :)}
feel free to pin this project if you like. :)
what have you been painting lately? are you as serious about doormats as me? pinched any pennies lately?
happy welcoming and happy thursday!
~~~~~~~~~~~~~~~~~~~~~~~~~~~~~~~~~~~~~~~~~~~~~~~~~~~~~~~~~~~~~~~~~~~~~~~
have you entered this weeks giveaway yet? there's still time! click HERE to enter now!
~~~~~~~~~~~~~~~~~~~~~~~~~~~~~~~~~~~~~~~~~~~~~~~~~~~~~~~~~~~~~~~~~~~~~~~
.jpg)

Comments
Post a Comment